Software/Binary Labview Driver
This LabVIEW instrument driver includes subVIs and controls that make it easy to start controlling Zaber devices using the Binary protocol, which is the default protocol of Zaber T-Series and A-Series devices, and is available on Zaber X-Series devices. A LabVIEW driver for using the ASCII protocol, which is available on Zaber A-Series and X-Series devices, is available here. Instructions for switching between the Binary and ASCII protocols are available here. For details on the different Zaber device series see the Series Reference Table.
Installation
You can download the driver in LabVIEW from the Help menu: Find Instrument Drivers.... Search for the keyword Zaber, select the driver and it will be installed automatically. You can also download it directly from the Instrument Driver Network or from our web site and unzip the folder into <National Instruments>\LabVIEW<xxxx>\instr.lib. If you have trouble finding the driver or installing it, please contact us or National Instruments.
This driver requires the latest NI-VISA driver to also be installed.
VIs included in the driver
Now that you've installed the instrument driver, here's a list of the most important VIs that come with it. To see them in action, look at the examples section below. To see the inner details of how one of these VIs works, add it to a diagram and double click on its icon. When the VI opens, switch to the wiring diagram to find more documentation and to see how it works.
 Initialize VI
- Configures a serial port to communicate with a Zaber device. Call this VI before calling other instrument driver VIs for this instrument. Generally, you need to call the Initialize VI only once at the beginning of an application. The Initialize VI gives the serial port an infinite timeout by default, because some Zaber Device commands can take a long time to complete. You can change this timeout if you want to check for disconnected devices or other timing problems. See the example VI, Expert - Change Timeout.
 Close VI
- Terminates the software connection to the instrument. If you don't use the Close VI, LabVIEW won't complain but other applications won't be able to use the COM port.
 Request Command VI
- Sends a command and waits for a response. If the response is an error, sets error code -1074001617 and includes the Zaber error code in the message. This is the VI you should use most often. The only time to use the Read and Write VI's is when you want to send more requests while a move is still executing. To create the request cluster, right click on the Request input, and choose Create: Constant.
 Read Response VI
- Reads a response packet from the serial port. If no response is waiting, Response just returns zeroes and Responses out equals Responses in.
 Blocking Read Response VI
- Reads a response packet from the serial port. If no response is waiting, this blocks until a response is received. See the Read Response VI for one that doesn't block.
Example VIs
If you installed the instrument driver, you can find all of these examples from the Help menu: Find Examples.... Search for examples with the keyword "Zaber". If you downloaded the zip file, the examples are in the examples folder.
In addition to these examples, we've also posted some questions and answers on StackOverflow.com.
Beginner - Send a List of Commands
Beginner - Send Commands in a Loop
Intermediate - Read Input from User and Display Responses
Intermediate - Read Response Data
| Most commands return some kind of data, and you can use that data. In this example, we check that there is room for the movement before starting. This example introduces the Unbundle By Name function.
Note that not all commands are included in the drop down list. This example uses command 53: Return Setting with command 45: Set Current Position as the data value. To use a command that's not in the drop down list, select <Other>... and then type the command number. See your user manual for a complete list of all commands. |
 |
Expert - Change Timeout
Expert - Enter a List of Commands
| This example is more general purpose than the previous ones. It lets you enter a list of commands and then executes them, waiting for responses before sending the next command. If you send any commands to device 0 (All devices) or any group aliases, be sure to tell each command how many responses to wait for. This example is similar to the script editor in the Zaber Console.
LabVIEW features demonstrated here include autoindexed input from the Requests array, and a case structure around the Request (doesn't send after the quit button is clicked). |
 |
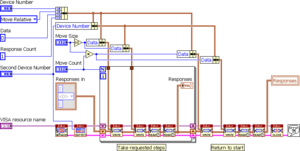
Expert - Simultaneous Requests
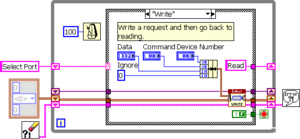
Expert - Write Commands and Read Responses
| Another general purpose example. It lets you send one command at a time and displays any responses that come back from the device. This is useful if you want to see responses that aren't caused by requests from the computer, such as manual control or joystick control. This example is similar to the command grid in the Zaber Console.
The block diagram is an example of the state machine pattern. It starts in the "Select Port" state and waits until you select a port. Then it opens the port in "Open" and goes to "Read". It stays in "Read" and checks for responses until you click a button. "Write" sends the command and then goes right back to "Read". "Close" exits. The diagram screenshots shown here are for the "Read" state and the "Write" state. |
  |
Custom Error Codes
Our instrument driver defines these custom error codes:
- -1074001617
- error response from device
- -1074001616
- partial response packet
- -1074001615
- failed self test
Any other error codes must be coming from somewhere else. One common error is "VISA: (Hex 0xBFFF0015) Timeout expired before operation completed." or error code -1073807339. This occurs if you've set a timeout on the serial port and no response is received. If you get this error from the self-test, be sure that you've selected the right device number, and that the device is turned on and connected to the computer.


